
Last updated: February 23, 2026
Key Takeaways
• Professional septic inspections involve visual assessment, tank excavation, camera inspection, and flow testing to evaluate system health
• Visual inspection covers indoor plumbing, outdoor drain field, and structural components for signs of backup or failure
• Tank access and excavation allows inspectors to check internal conditions, sludge levels, and structural integrity
• Camera inspection uses specialized equipment to examine pipes and baffles for blockages or damage
• Flow testing measures how well effluent moves through the system to detect potential problems
• Drain field assessment identifies standing water, odors, and soil saturation that indicate system failure
• Comprehensive reporting provides detailed findings, repair recommendations, and maintenance guidance
• Annual inspections help prevent costly repairs and ensure proper system function for homeowner safety
Quick Answer
A septic inspection involves a thorough evaluation of your entire septic system, including visual checks of indoor plumbing and outdoor components, tank excavation to access and examine internal conditions, camera inspection of pipes and baffles, flow testing to measure system performance, and drain field assessment for signs of failure. The process typically takes 2-4 hours and results in a detailed report with findings and recommendations.
Why Do You Need to Know What Happens During a Septic Inspection?
Understanding what happens during a septic inspection helps you prepare for the process and know what to expect from your inspector. A professional septic inspection evaluates your entire wastewater treatment system to identify current problems and prevent future failures that could cost thousands in repairs.
Most homeowners need septic inspections when buying or selling property, but regular inspections also help maintain system health. The inspection process examines both visible components and hidden elements that affect your septic system’s performance.
A thorough inspection can reveal issues like tank damage, pipe blockages, or drain field problems before they become expensive emergencies. Knowing the inspection steps helps you ask informed questions and understand the inspector’s findings.
What Does the Initial Visual Assessment Cover?
The visual assessment begins with checking all indoor plumbing fixtures for proper drainage and signs of backup. Inspectors test toilets, sinks, showers, and floor drains to ensure wastewater flows normally without gurgling sounds or slow drainage that could indicate system problems.
Indoor inspection points include:
• Toilet flushing performance and water levels
• Sink and shower drain flow rates
• Floor drain functionality in basements or utility rooms
• Signs of sewage backup or water damage
• Unusual odors near plumbing fixtures
Outdoor visual assessment covers:
• Septic tank location and access points
• Distribution box and pump chamber visibility
• Drain field area for standing water or wet spots
• Bright green vegetation indicating nutrient overload
• Ground settling or depressions over the tank
Common mistake: Homeowners often assume slow drains are just pipe clogs, but during an inspection, these symptoms help identify septic system capacity issues or blockages that need professional attention.
The visual assessment also includes checking your home’s plumbing layout to understand how wastewater flows to the septic system. This helps inspectors identify potential problem areas and plan the detailed examination phases.
How Do Inspectors Access and Examine the Septic Tank?
Tank access requires excavation to uncover septic tank lids and create safe working conditions for detailed inspection. Professional inspectors use specialized equipment to locate and expose tank openings while following safety protocols for confined space work.
Excavation process involves:
• Locating tank lids using probing tools or electronic locators
• Carefully digging to expose access ports without damaging the tank
• Removing heavy concrete or plastic lids with proper lifting equipment
• Setting up safety barriers around open tank areas
• Preparing lighting and ventilation for safe inspection work
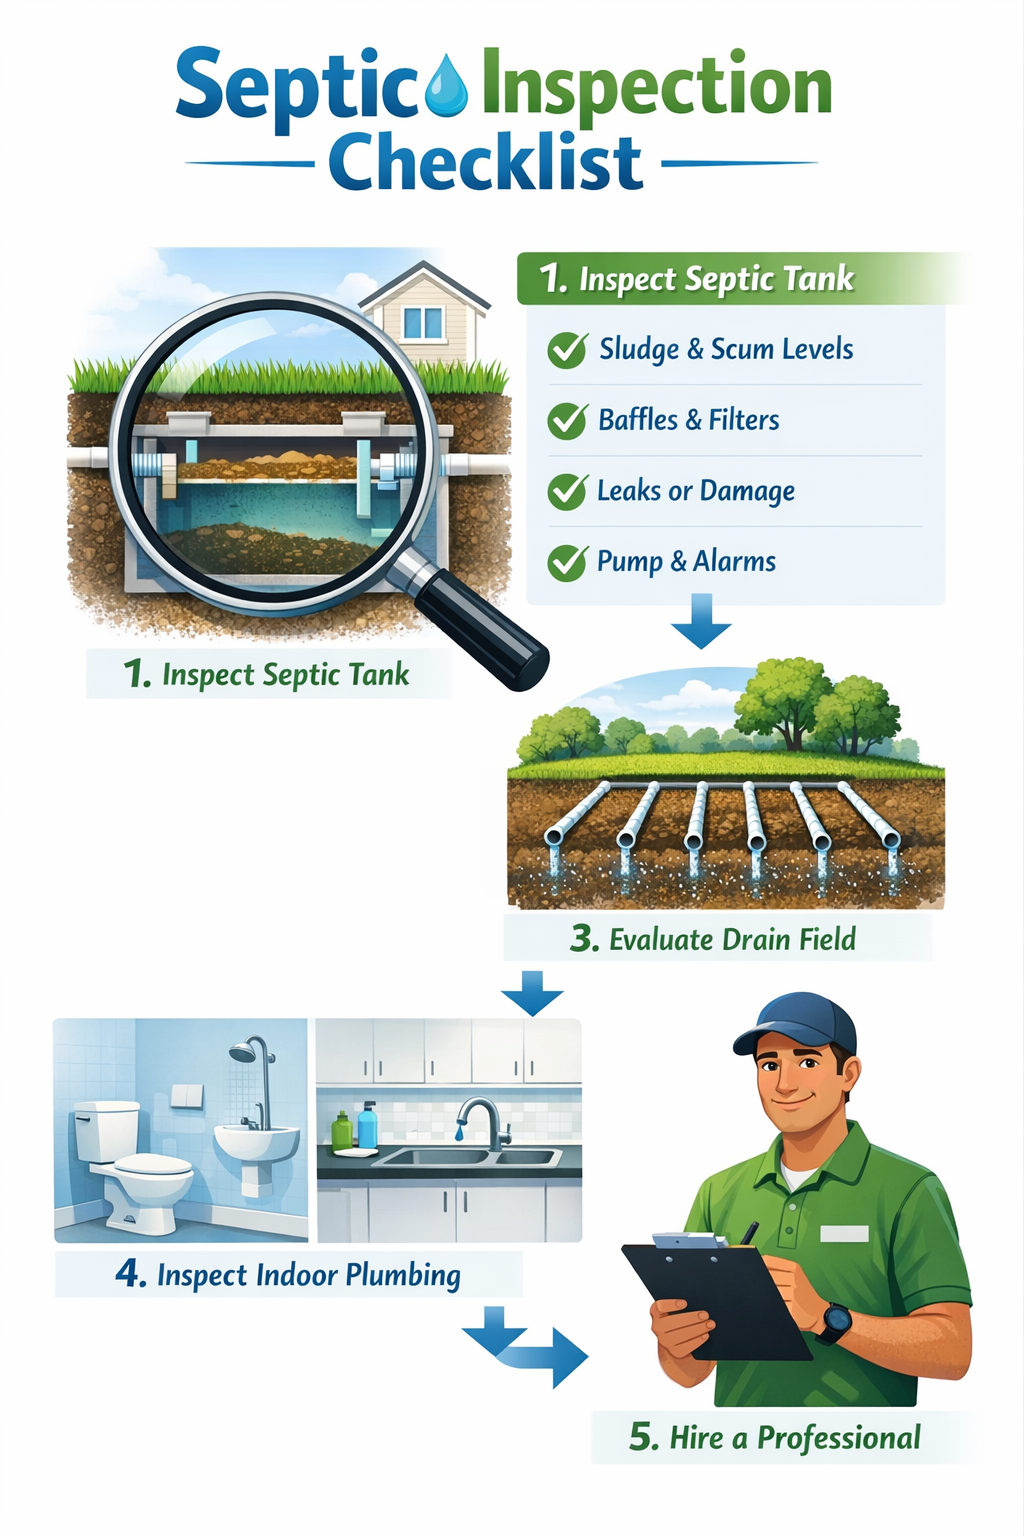
Tank examination includes:
• Measuring sludge and scum layer thickness
• Checking tank walls for cracks, corrosion, or structural damage
• Inspecting inlet and outlet baffles for proper function
• Testing tank capacity and liquid levels
• Looking for root intrusion or foreign objects
Choose professional inspection if: Your tank hasn’t been opened in over 3 years, you notice drainage problems, or you’re buying/selling property. DIY tank opening is dangerous due to toxic gases and structural hazards.
Inspectors use specialized tools like sludge judges to measure waste layer thickness and determine if pumping is needed. They also check that tank baffles are intact and properly positioned to prevent solids from entering the drain field.
What Camera Inspection Techniques Reveal Hidden Problems?
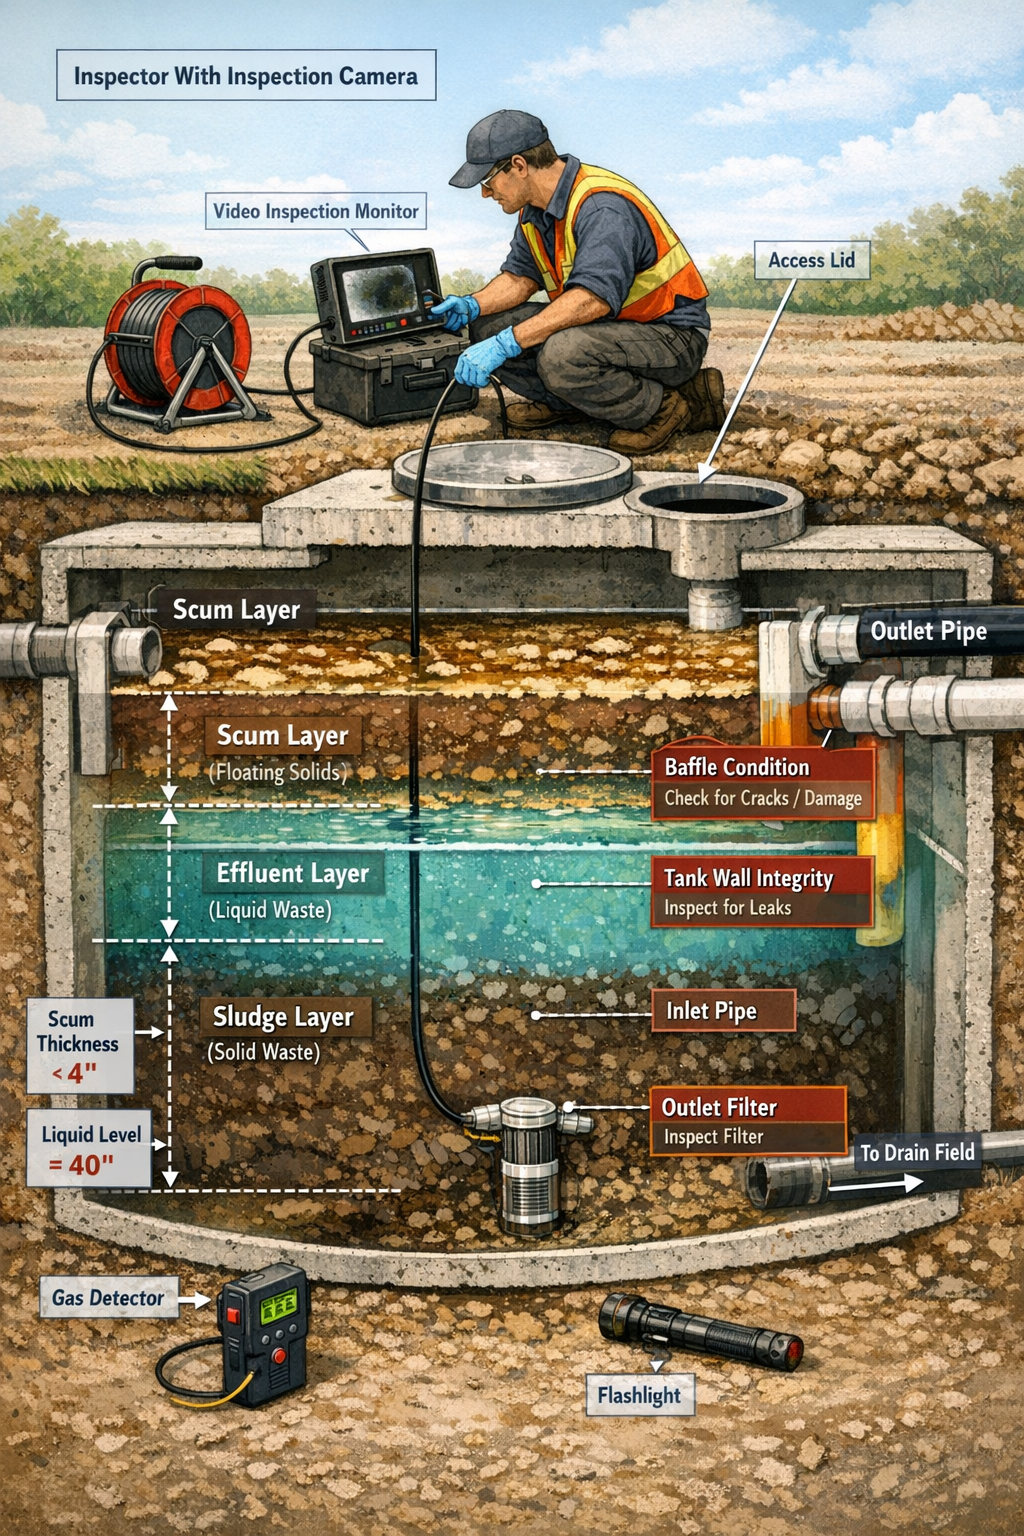
Camera inspection uses waterproof sewer cameras fed through tank outlets and distribution systems to examine pipes and components that aren’t visible during standard inspection. This technology reveals blockages, root intrusion, and pipe damage that could cause system failure.
Camera inspection process:
• Inserting flexible camera lines through outlet baffles
• Recording video footage of pipe interiors and connections
• Identifying root intrusion, debris buildup, or structural damage
• Checking distribution box and pipe network condition
• Documenting problem areas with timestamped video evidence
Common findings include:
• Tree root penetration blocking effluent flow
• Collapsed or crushed pipes from ground settling
• Grease buildup restricting pipe diameter
• Foreign objects causing partial blockages
• Separated pipe joints allowing soil infiltration
Edge case consideration: Older septic systems with clay or metal pipes often show more deterioration than modern PVC systems, requiring more extensive camera inspection to assess replacement needs.
The camera inspection helps inspectors evaluate whether problems require simple cleaning, pipe repair, or complete system replacement. Video documentation also provides clear evidence for insurance claims or repair estimates.
FYI: Some links may be affiliate links, which means I may earn a small commission at no extra cost to you.
For homeowners dealing with recurring drainage issues, maintaining proper septic tank bacteria balance can help prevent some blockages. Products like Septifix tablets help break down waste and reduce buildup that cameras often detect during inspections. These monthly treatments can help keep your system functioning between professional inspections.
How Does Flow Testing Measure System Performance?
Flow testing measures how effectively your septic system processes and moves wastewater through each component. Inspectors introduce controlled amounts of water to evaluate system capacity and identify bottlenecks that could cause backups or failures.
Flow testing procedures:
• Running multiple fixtures simultaneously to test peak capacity
• Measuring drainage rates from toilets, sinks, and showers
• Monitoring effluent flow from tank to distribution system
• Checking pump performance in pressurized systems
• Testing drain field acceptance rates and soil percolation
Performance indicators measured:
• Time for fixtures to drain completely
• Water level changes in tank compartments
• Effluent clarity and flow consistency
• Pump cycle frequency and duration
• Ground saturation around drain field pipes
Decision rule: Choose immediate repairs if flow testing reveals backup into the tank, standing water in the drain field, or pump failure. These conditions indicate system overload or component failure requiring prompt attention.
Flow testing often reveals signs your septic tank needs maintenance before visible problems appear. Inspectors can detect reduced capacity, pump issues, or drain field saturation that homeowners might not notice during normal use.
The testing process helps determine if problems stem from tank capacity issues, pipe blockages, or drain field failure. This information guides repair priorities and helps estimate costs for necessary improvements.
What Drain Field Assessment Techniques Identify Problems?
Drain field assessment examines soil conditions, pipe networks, and surface indicators to determine if your leach field properly treats and disperses effluent. This evaluation identifies saturation, blockages, or soil failure that could cause environmental contamination.
Assessment methods include:
• Visual inspection for standing water or wet areas
• Soil probing to check saturation levels below ground
• Vegetation analysis for unusual growth patterns
• Odor detection indicating surfacing sewage
• Ground penetrating radar for pipe location and condition
Problem indicators:
• Bright green grass over drain lines from excess nutrients
• Soggy ground or standing water after dry weather
• Sewage odors in yard areas near the drain field
• Ground settling or depressions over distribution pipes
• Algae growth in nearby ditches or water bodies
Common mistake: Homeowners often think lush grass over drain fields indicates good system performance, but this usually signals effluent surfacing due to soil saturation or pipe problems.
Inspectors also test soil percolation rates to ensure your drain field can handle your household’s wastewater volume. Poor soil conditions may require drain field expansion or alternative treatment systems to meet local health codes.
The assessment determines if drain field problems require simple repairs like cleaning distribution boxes, or major work like installing new leach lines. Early detection helps prevent costly soil replacement or system redesigns.
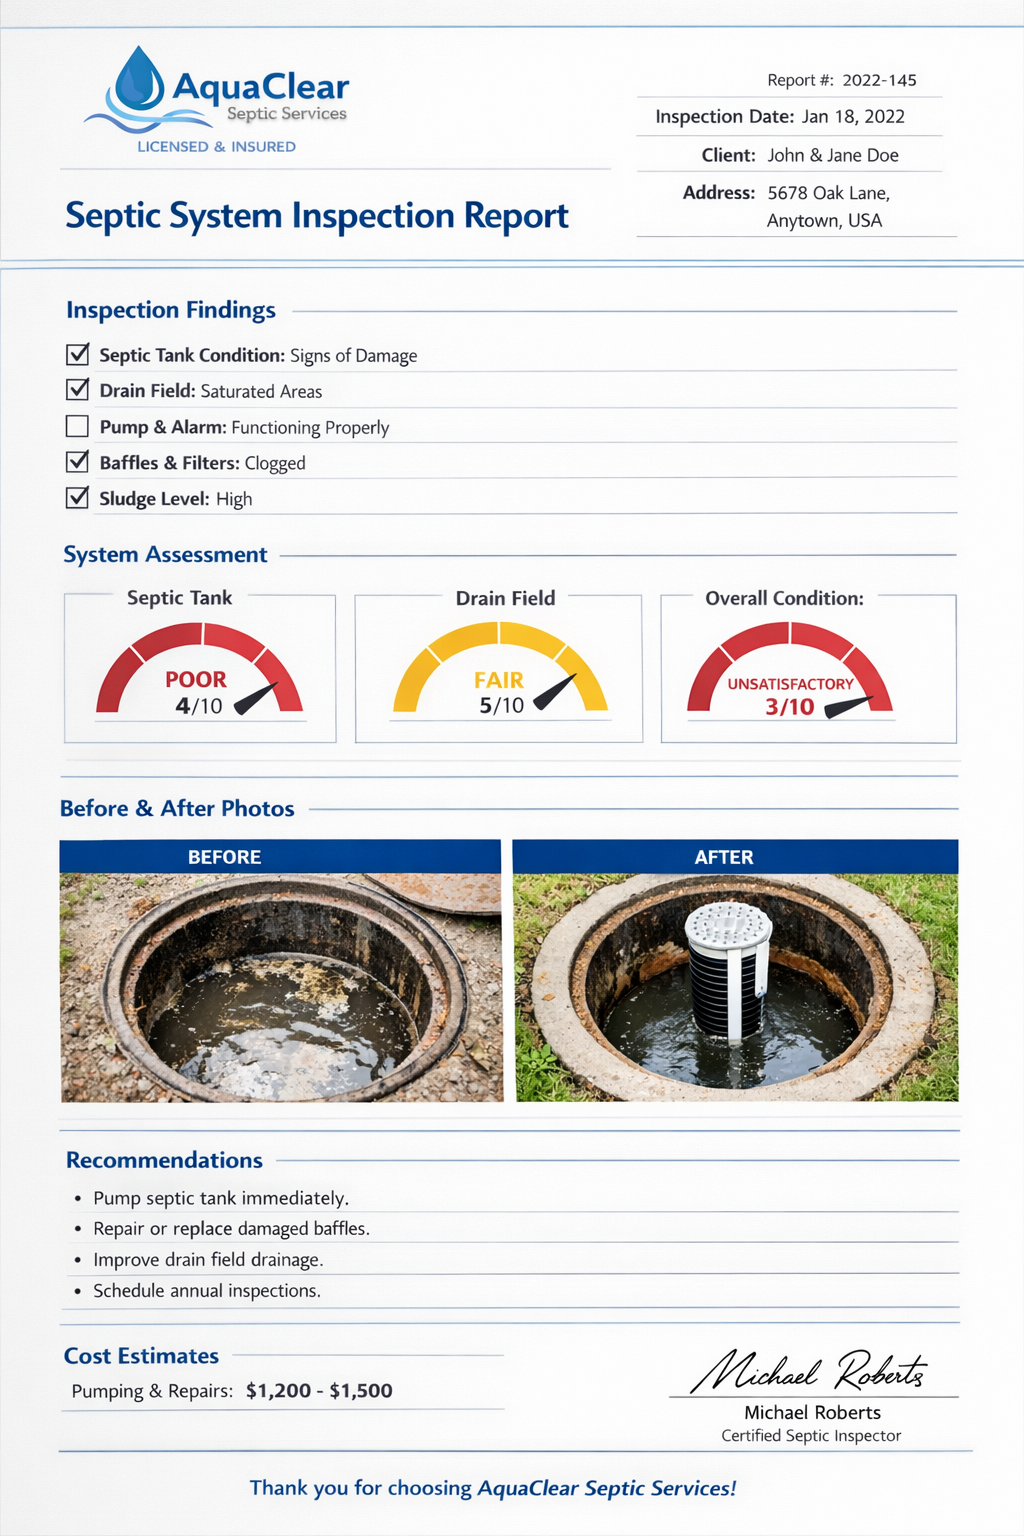
What Should You Expect in the Inspection Report?
A comprehensive inspection report documents all findings, provides repair recommendations, and includes maintenance guidance to help you understand your system’s condition and next steps. Professional reports include photos, measurements, and clear explanations of any problems discovered.
Report sections typically include:
• Executive summary of overall system condition
• Detailed findings for each system component
• Photographic evidence of problems or normal conditions
• Repair recommendations with priority levels
• Estimated costs for necessary improvements
• Maintenance schedule and care instructions
Key information provided:
• Tank condition and pumping recommendations
• Pipe and baffle integrity assessment
• Drain field performance evaluation
• Safety concerns requiring immediate attention
• Compliance with local health department regulations
Choose immediate action if: The report identifies sewage surfacing, structural tank damage, or complete drain field failure. These conditions pose health risks and may violate local environmental regulations.
Quality inspection reports help you prioritize repairs and budget for system improvements. They also provide documentation for insurance claims, property sales, or permit applications for system modifications.
Understanding your inspection report helps you make informed decisions about septic tank maintenance practices and avoid unnecessary repairs or upgrades that don’t address actual problems.
How Often Should You Schedule What Happens During a Septic Inspection?
Most septic systems need professional inspection annually to catch problems early and maintain optimal performance. However, inspection frequency depends on system age, household size, and local regulations that may require more frequent evaluations.
Recommended inspection schedule:
• Annual inspections for systems over 10 years old
• Every 2-3 years for newer systems with proper maintenance
• Before property sales to identify needed repairs
• After major repairs to verify proper system function
• Following heavy usage periods like large gatherings or construction
Factors affecting inspection frequency:
• Household size and wastewater volume
• System age and component condition
• Local health department requirements
• Previous repair history and ongoing issues
• Environmental sensitivity of your property location
Edge case: Properties with alternative septic systems like sand filters, lagoons, or aerobic treatment units often require more frequent inspections due to complex mechanical components and stricter regulatory oversight.
Regular inspections help you avoid emergency situations like septic tank backing up into your house by identifying problems before they cause serious damage or health hazards.
Scheduling inspections during dry weather provides the most accurate assessment of your system’s normal operating conditions. Wet weather can mask drain field problems or make tank access dangerous for inspectors.
What Preparation Steps Help Ensure Effective Inspections?
Proper preparation before your septic inspection helps inspectors work efficiently and provides more accurate results. Simple preparation steps can save time and ensure all system components receive thorough evaluation during the inspection process.
Pre-inspection preparation:
• Locate and mark septic tank and distribution box covers
• Clear vegetation and debris from access areas
• Provide system records including previous inspection reports
• Note any recent drainage problems or unusual odors
• Ensure inspector access to all indoor plumbing fixtures
Documentation to gather:
• Previous pumping and maintenance records
• System installation permits and as-built drawings
• Records of any repairs or component replacements
• Water usage patterns and household occupancy changes
• Any chemicals or additives used in the system
Choose professional help if: You can’t locate system components, have safety concerns about tank access, or notice signs of system failure like sewage odors or backup. Professional locating services can safely identify buried components.
Having maintenance records helps inspectors understand your system’s history and identify patterns that might indicate developing problems. This information also helps verify that previous repairs were completed properly.
Good preparation ensures inspectors can focus on system evaluation rather than spending time locating components or gathering basic information about your septic system’s configuration and maintenance history.
Helpful Resource for Ongoing Septic Care
While professional inspections are essential for identifying major problems, maintaining your septic system between inspections helps prevent many issues that inspectors commonly find. Simple monthly maintenance can reduce the buildup and blockages that often show up during camera inspections.
Septifix tablets offer an easy way to support your septic system’s bacterial balance and waste breakdown processes. With one monthly flush, these tablets help break down waste, reduce odors, and keep your system working efficiently between professional inspections. This simple maintenance step can help prevent some of the blockages and buildup that inspectors often discover during routine evaluations.
Regular maintenance combined with professional inspections provides the best protection for your septic investment and helps avoid costly emergency repairs that could have been prevented with proper care.
Frequently Asked Questions
How long does a septic inspection take?
Most septic inspections take 2-4 hours depending on system complexity and accessibility. Simple systems with easy tank access may take less time, while complex systems with multiple components or difficult access may require a full day.
Do I need to be present during the inspection?
You don’t need to be present for the entire inspection, but being available at the beginning and end helps you understand findings and ask questions. Inspectors appreciate having someone available to answer questions about system history or recent problems.
How much does a septic inspection cost?
Septic inspections typically cost $300-$600 depending on your location and system complexity. This investment helps identify problems early and can save thousands in emergency repairs or environmental cleanup costs.
What happens if the inspection finds major problems?
If inspectors find serious issues like tank failure or drain field problems, they’ll provide repair recommendations with priority levels. You’ll need to address safety concerns immediately, but other repairs may be scheduled based on severity and budget considerations.
Can I inspect my own septic system?
While you can perform basic visual checks for obvious problems, professional inspection requires specialized equipment and safety training. Tank access involves dangerous gases and confined space hazards that require professional expertise.
Should I pump my tank before or after inspection?
Schedule inspection before pumping so inspectors can evaluate sludge levels and system performance under normal conditions. Pumping after inspection ensures any problems identified don’t interfere with tank cleaning.
What if my system passes inspection but I still have drainage problems?
Passing inspection means major components are functioning, but you may have minor blockages or capacity issues. Discuss ongoing problems with your inspector to identify solutions that don’t require major system changes.
How do I find a qualified septic inspector?
Look for inspectors certified by your state health department or professional organizations. Ask for references, verify insurance coverage, and choose inspectors who provide detailed written reports with photographic documentation.
What records should I keep after inspection?
Keep inspection reports, photos, and recommendations for future reference. These records help track system condition over time and provide valuable information for future inspectors or repair contractors.
Do inspection requirements vary by location?
Yes, local health departments set specific inspection requirements and frequencies. Some areas require annual inspections while others mandate inspections only for property sales or permit renewals. Check with your local health department for specific requirements.
What’s the difference between inspection and maintenance?
Inspection evaluates system condition and identifies problems, while maintenance includes services like pumping, cleaning, and minor repairs. Both are necessary for proper septic system care and longevity.
Can weather affect inspection results?
Heavy rain can make drain field assessment difficult and may mask some problems. Inspectors prefer dry conditions for accurate evaluation, but emergency inspections may proceed regardless of weather conditions.
Conclusion
Understanding what happens during a septic inspection helps you prepare for the process and make informed decisions about your system’s care. Professional inspections involve systematic evaluation of every component, from indoor plumbing assessment to detailed drain field analysis, providing comprehensive information about your system’s condition and performance.
The inspection process—including visual assessment, tank excavation, camera inspection, flow testing, and drain field evaluation—identifies current problems and prevents future failures that could cost thousands in repairs. Regular inspections combined with proper maintenance help ensure your septic system operates safely and efficiently for decades.
Take action now by:
• Scheduling annual inspections to catch problems early
• Keeping detailed records of all inspections and maintenance
• Addressing inspector recommendations promptly to prevent major failures
• Learning to recognize signs of septic system problems between professional evaluations
• Following proper maintenance practices to extend system life
Professional septic inspection is an investment in your property’s value and your family’s health. The detailed information provided helps you budget for necessary improvements and avoid emergency situations that could cause environmental damage or health hazards.
Don’t wait for obvious problems to appear—schedule your next septic inspection today and take control of your system’s long-term performance and reliability.
References
[1] Septic Inspection Service – https://westcoastsanitationinc.com/septic-inspection-service/
[2] A 3 Step Checklist For Septic Tank Inspection – https://www.aaapumpingservice.net/a-3-step-checklist-for-septic-tank-inspection
[9] Inspecting Septic Systems – https://www.nachi.org/inspecting-septic-systems.htm